Contract Management System
The Procurement Contract Management System is a centralized system designed to increase the efficiency of contracting and contract management. Through standardization and automation, we increase processing speed, approval, transparency, and reporting and reduce individual and institutional risk.
Click here to see the Agiloft - Contract Management System Article in the ITC Service Portal
Need Help?
Contract Assistance email: Procurement.Services@dartmouth.edu
Technical Assistance email: Agiloft.Help@dartmouth.edu
Live Training via Zoom
Live Agiloft Contract Management System training continue to be offered. The live training provides an overview of procurement policies, contracting basics, and instructions for requesting and viewing contracts in the Agiloft Contract Management System.
Registration is required. Click on the dates below to register through Zoom.
- Stay tuned. More trainings to be scheduled soon.
Note: use your netid@dartmouth.edu in the email fields.
Table of Contents
About the Contract Management System
Submitting a Contract Request
Effective Searching
Approving a Contract
Approving a Contract from within the Contract Management System
Navigating the Contract Management System
Setting Work Status to “On Vacation” and adding a Backup Person
Creating a Digital ID Signature in Adobe
Signing a PDF with a Digital ID
Introduction to the Contract Management System Presentation (pdf)
CMS Video Training
About the Contract Management System
The Procurement Services Contract Management System is hosted by Agiloft. The contract management system manages contracts for the purchase of good and services. Contract types that are outside the scope of the new system include employment contracts, sponsored project subawards, and intellectual property contracts.
Watch the Contract Management Process
Watch Clarifying the Role of Contracts and Purchase Orders
Who can use the Contract Management System?
The Contract Management System is available to active faculty and staff. Students who need to initiate a contract should work with their sponsoring department.
How do I access the Contract Management System?
- Go to Contract Management System or dartgo.org/agiloftcms and sign-in using Single Sign-On (SSO).
- Watch how to bookmark the Contract Management System in Chrome or Firefox
Permission Groups
- Contract Requesters
- Department Administrators
- Approvers
- Contract Managers/Legal Specialists
Submitting a Contract Request
Watch Creating a Contract Request
- Navigate to the Contract Management System and log in via SSO.
- Under the “Contracts” header, click “Create a Contract Request.”

- Fill out the Details tab of the contract request as follows:
- Select the Record Type
- Master Agreement
- Agreements
- Statement of Work (SOW)
- Non-Disclosure Agreement (NDA)
NOTE: This MUST be done before you select the Contract Type, as the Contract Type is filtered by the Record Type.
- Select the Contract Type. This filters the visibility and requirement of key fields
in the request form.
See Contract Management for detailed description of Record and Contract Types
Note: Record Type and Contract Type, as well as, field selections may result in additional fields being displayed. Additionally, required fields are notated with blue text with an asterisk. - If you are requesting the contract for yourself, the requester information will be
automatically filled out. If you are requesting on behalf of someone else, indicate
the requester here. See Effective Searching, if you have difficulty finding the individual you are looking for.

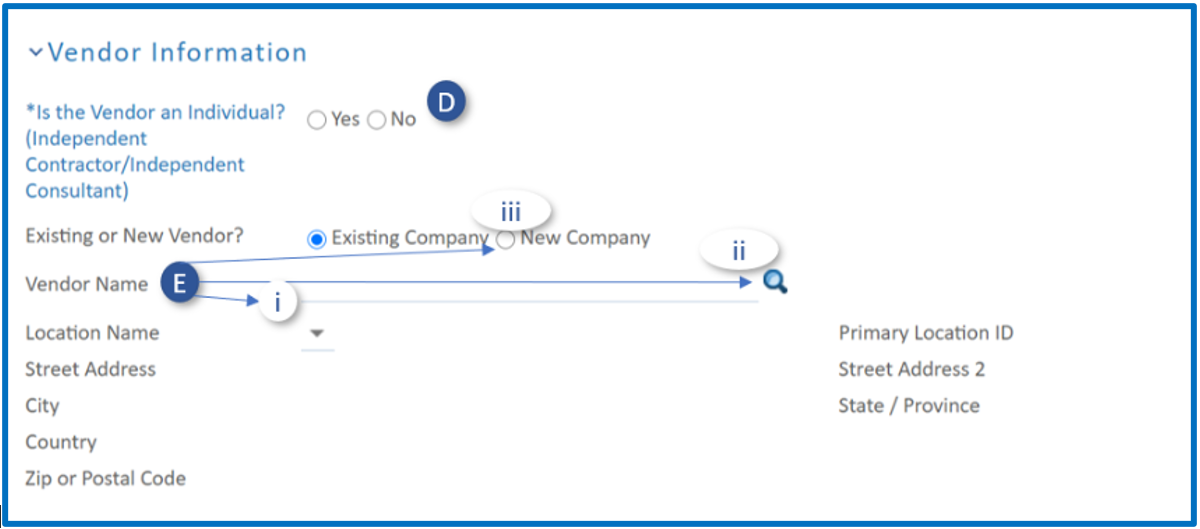
- Within the Vendor Information section, you will be prompted "Is the Vendor an Individual?" If submitting a contract for an Individual, Independent Contractor/Independent Consultant, see Independent Contractor/Independent Consultant Due Diligence
- Fill in the vendor information one of three ways:
- Start typing the name of an existing vendor and select the correct vendor when they appear in the auto-complete list.
- Click the look-up icon and use the system look-up to search for an existing vendor. See Effective Searching, if you have difficulty finding the vendor you are looking for.
- If the vendor is not in the system, select "New Company" and add the new vendor information to the fields that appear.
- Select the primary vendor contact from the drop-down list, or select "New Contact"
to add a contact not in the system already.
- The Contract Information section is where you provide the main details of the Contract. Details include: the
nature of work, description of fees, Contract Title, Contract Description, and Contract
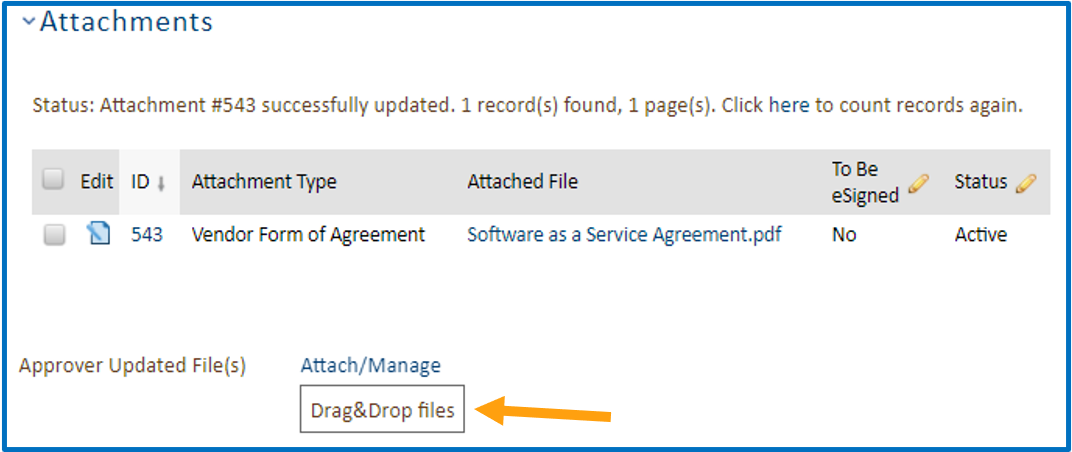
Dates. If the vendor has provided a scope of work (SOW), this can uploaded by clicking
"Attach/Manage" or by dragging the file over and dropping it onto the "Drag&Drop files"
box.

-
The Vendor Sourcing section ensures that diligence was given during the vendor selection process and particularly with purchases of more then $9,999. In addition, the contract requester is asked to disclose if there is a conflict of interest between any individuals that participated in the vendor selection on behalf of the College and the vendor.
-
The Funding section covers the anticipated Total Contract Value and the primary GL Org or Award that will be funding the purchase.
- Select the Record Type
- If the request is being funded on a CIP, the contract requester will be asked the responsible person of the CIP
- If the request is Grant Funded the PI will need to be entered so to be notified of the request. If the Contract is greater than $5,000, OSP will also be notified of the Contract Request.
- If the request is GL Funded, the person responsible for managing the Org will be required to Preliminary Approve the request.
- If the request is on a CIP, Grant, and/or GL, all relevant parties will be notified of the request.
- If the request is for an institutional Service/Goods Agreement for a procurement contract, use "PIA" to denote Procurement Institutional Agreement.
- If the request is for an institutional Service/Goods Agreement for facilities, use "CIA" to denote Campus Service Institutional Agreement.
 Upload any applicable documents by clicking "Attach/Manage" or by dragging the file
over and dropping it onto the "Drag&Drop files" box.
Upload any applicable documents by clicking "Attach/Manage" or by dragging the file
over and dropping it onto the "Drag&Drop files" box.- The Dartmouth Data Security section is designed to give thought and diligence to the type of information we are
providing our vendors, either for person, financial, intellectual property, etc. The
DISC Level refers to our Data Information Security as outlined in the Dartmouth Information Security Policy. Below are the definitions of the 4 levels:
- Level 0 - Data meant for public disclosure is defined as Level 0.
- Level 1 - Data with no confidentiality classification, but not intended for public disclosure, is considered Level 1 data. This is general business data for use within Dartmouth, and protected at a baseline level of control (available to the Dartmouth community via authenticated IT access, or authorized physical access to Dartmouth facilities).
- Level 2 - Data classified as level 2 are data which can only be shared with individuals deemed to have a 'need to know' as defined by the data owner.
- Level 3 - Data classified as level 3 are data classified as strictly confidential, requiring the highest level of sensitivity. This includes FERPA data, personally identifiable information (PII), personal health information (PHI), credit card information (PCI), among others.
-
-
- The Software Agreements section is for those agreements involving software. If submitting a Software Agreement,
additional fields will display in this section. See Software Licenses/Maintenance Services Due Diligence for more information before submitting agreements for the purchase of software licenses
or software maintenance services.
-
- When all information is complete, click "Submit for Review."
Viewing Contract Requests
Watch the Overview of the Contract Requester Portal
Watch Navigating a Contract Record
To view contracts you have submitted or saved, click on "View My Contracts" on the Custom Portal.

This will bring you to your records within the My Contracts table. To access the record,
click on the edit icon or the blue ID number.
Note: Contracts may only be edited by the submitter while the contract request is
in the Draft Request and Pending Additional Information status.
The table can be sorted by clicking on the column header or use the Text field at the top of the table to search a keyword related to the Contract(s) to which you have access.

Effective Searching
Watch Effective Searching in the CMS
Global Search
To search the Agiloft system go to the search bar in the upper center portion of the
screen in Agiloft. Global searching can search all tables or by using the dropdown,
it is possible to search a specific Agiloft Table. 
Simple Text Search within a table
To bring up the search block, click Search on the right side of the action bar. The
default for the search block is a simple text search, which you can see below.
A text search checks all text fields of the records and returns results that have exact matches for the word or words searched. Searching for a number in a text search will search for the record ID that matches the number.
Changing the center operator from “contains” to “does not contain” will cause the system to exclude records containing the search terms and display the remaining records.
To search within a specific field, select the drop-down menu next to –TEXT– and select the field in which you want to search. Searching a specific field will use the same search rules as a text search – looking for the whole word – but in the specified field only.
String Search: What’s the difference?
Checking the box marked "String" allows you to search for portions of words within the system. For example, searching "tom" without the string search enabled will only pull up results that contain the name "Tom." However, enabling string search and searching for "tom" will return results with Tom, tomorrow, entomb, Tomas, etc.. It will return any word that contains the sequence "t-o-m," either as an independent word or as part of a larger word.
Context Search
A context search shows you the words surrounding the search results you are looking for. As an example, if you wanted to know where Tomas is listed in a record you could search “tomas” and find not only the records that contain their name, but also what role they play within the record from the context.
Refine Search
The refine search option allows you to take an already-searched table and further filter those results through a second set of parameters.
To run a refined search, simply run your first search then check the box next to "Refine" and run your second search.
Adding Addition Filters
To add additional filters to your search criteria, click "+ Add filters" button. A pop-up screen will display to the left of the search block where you can select from a list of fields.
 To change the operator, use the dropdown in the Operator field to display the list
of options.
To change the operator, use the dropdown in the Operator field to display the list
of options.

Viewing Search Terms
Once you have run a search, you can view what criteria was used to search in the header of the search result. Next to the Status line that tells you the number of results returned there is a link marked "Click for details." Clicking this link will display the search criteria used to find the results.
Clearing Search Results
To clear a search and view all available records, click "Clear All Filters" to the left of the Search in the search block.
Approving a Contract
Watch Approving a Contract Request
There are two approval workflows within the Contract Management System:
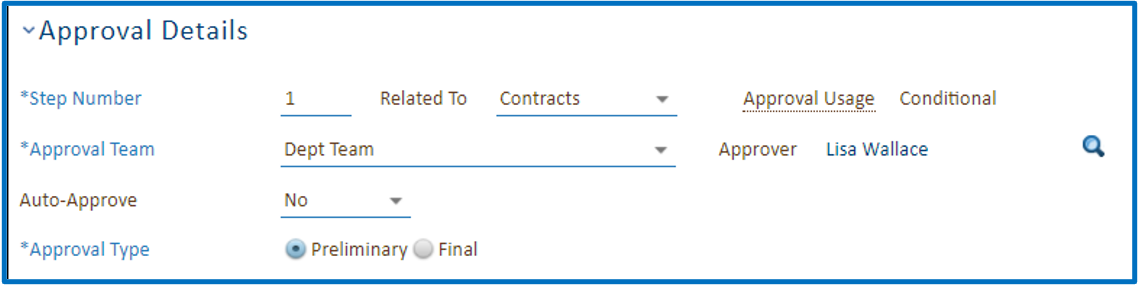
- Preliminary Approval of the Contract Request is routed to the responsible person of the GL Org or to the PI and OSP for PTAEO Awards to ensure funding is allocated for the requested agreement.
- Contract Approval of the Contract Agreement is the final approval prior to execution of the Contract and is based upon signature authority of the purchase and amount.
Approval Notification
Approval notification will automatically generate an Approval email message to the
appropriate approver. When an approval is assigned to you, you will receive an email
similar to the following: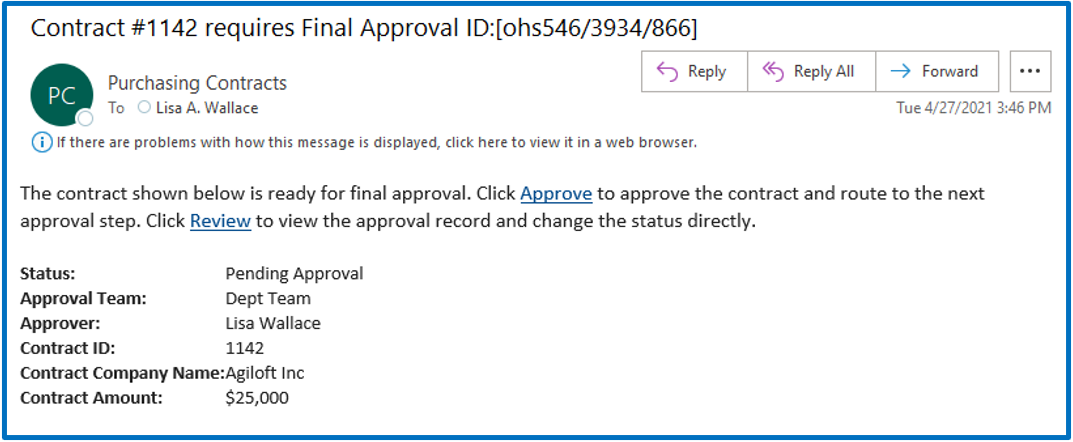
It is possible to approve directly from the email, by click on “Approve”, if you are
fully aware of the contents of the request and the information provided within the
email is sufficient. If you click "Approve" from the email, you will receive the following
message:
To review the record and take action, click on “Review”. This will take you to the full Approval record, within the Contract Management System.
Reviewing Contract Details
Watch Navigating the Contract Management System as a Power User
Watch Navigating a Contract Record
To view the Contract Details from the Approval record, scroll down the record to Contract Details and click on the Contract ID.
This will take you into the Contract Record. From here, you can review the Contract Information and any related attachments.
Accessing Approval Records directly in the Contract Management System
It is possible to access all Contract Approval requests directly within the Contract Management System.
- Navigate to the Contract Management System and log in via SSO.
- The approvals assigned to you can be viewed in the Approvals table, under "My Approvals".
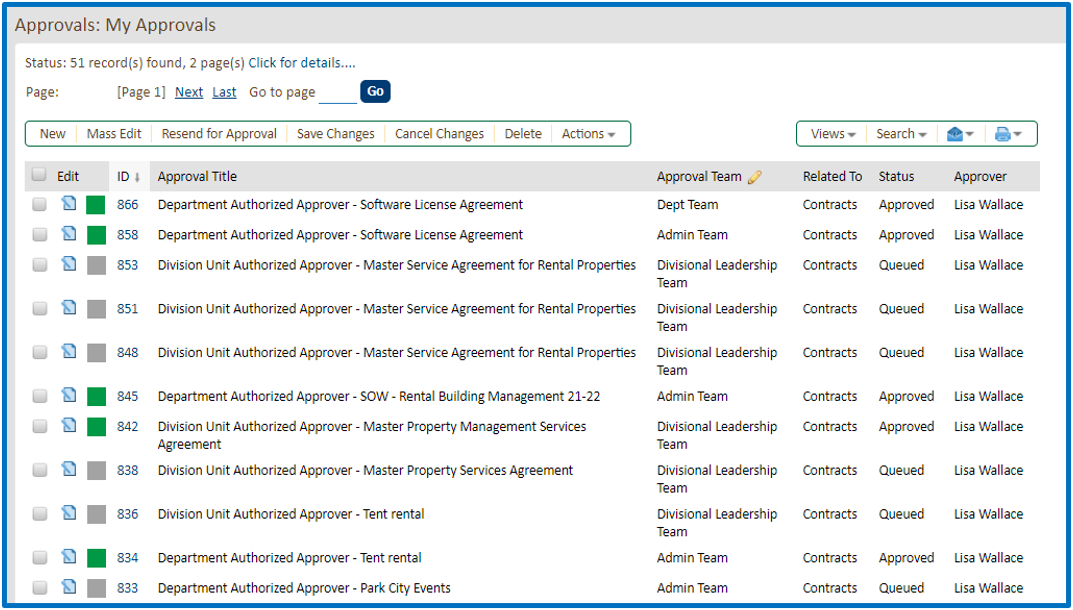
- The approvals assigned to you will display in all statuses.
- To edit the approval record, click on the edit icon.
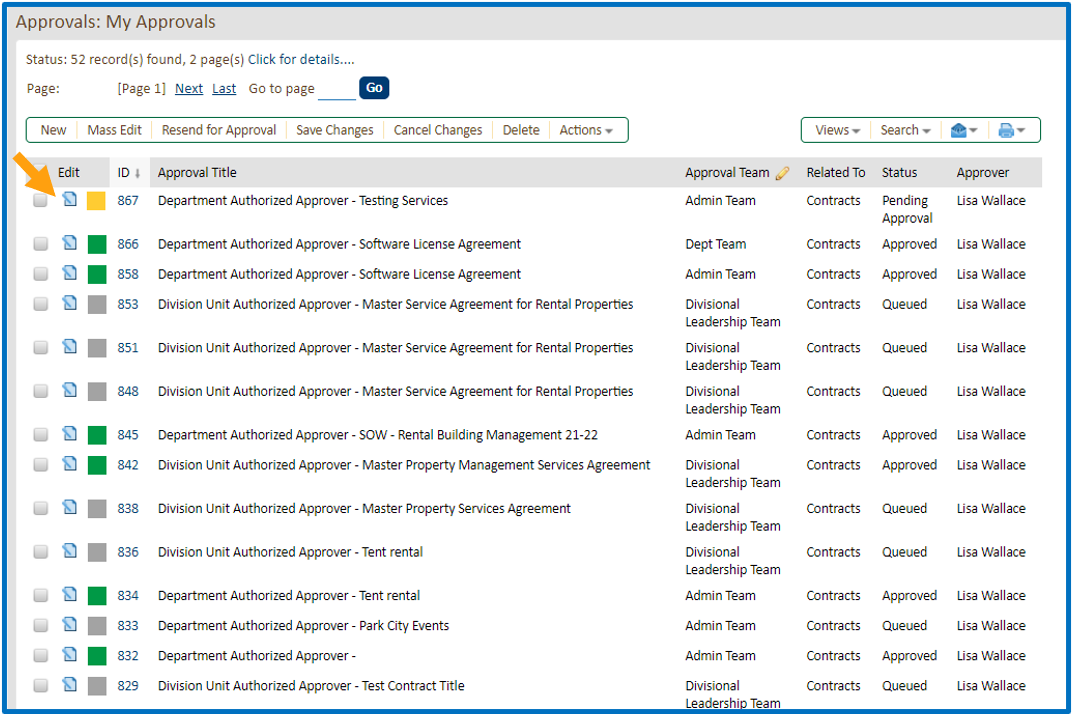
- The Approval Record will open, where you can "Approve" or "Require Changes".
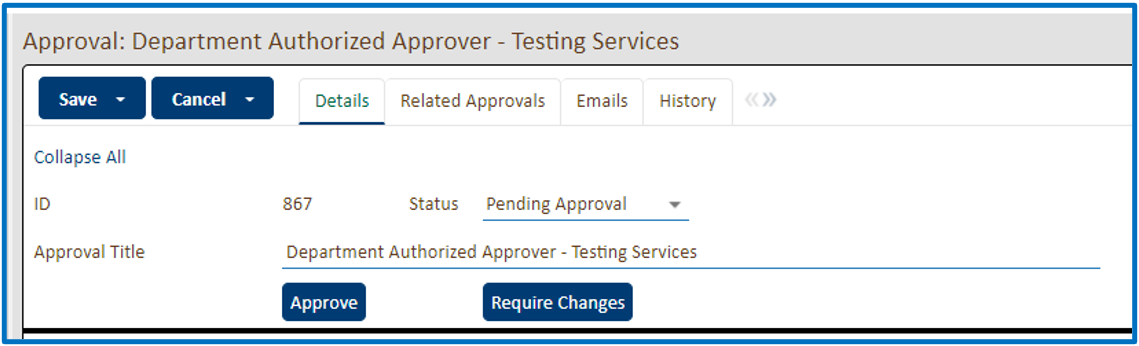
- Approval Details provide a summary of the approval.
- You can add notes in the "Approval Notes".
*Entering notes is required when requiring changes. Notes are shared with all approvers and with anyone who has access to the contract or documents.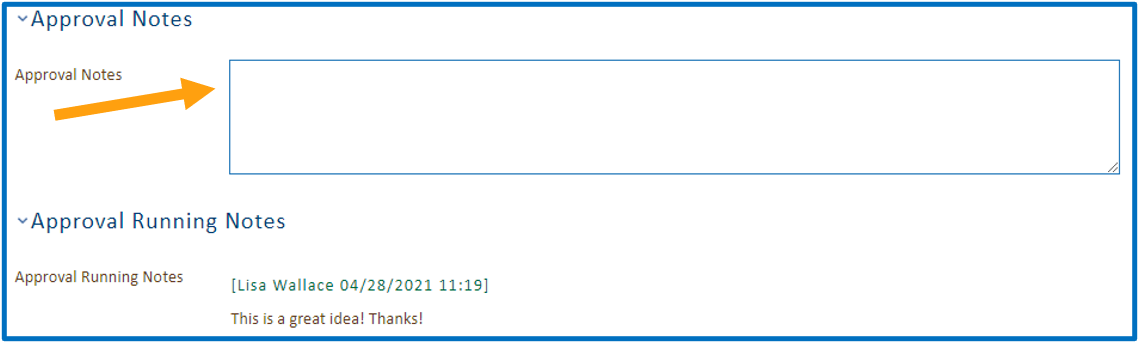
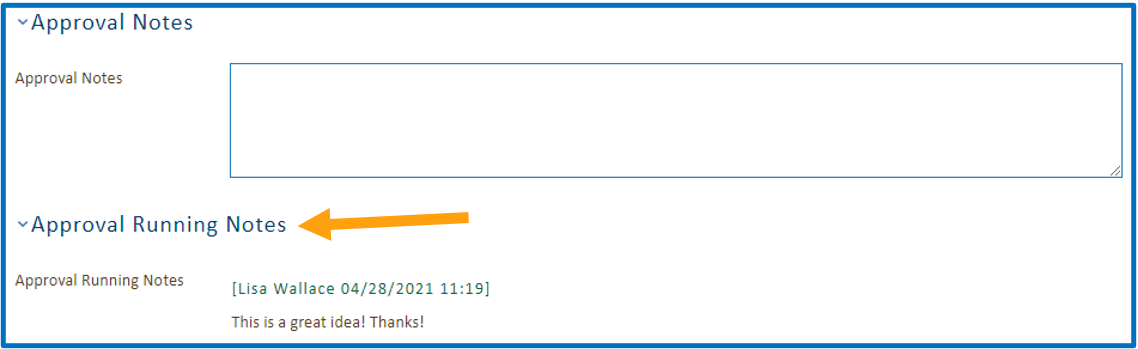
- Approval Running Notes displays all the running notes for this approval.
- Approval Details provide a summary of the approval.
- Attachments provides all related documents. Files that are to be approved are displayed
under "Approval Files".
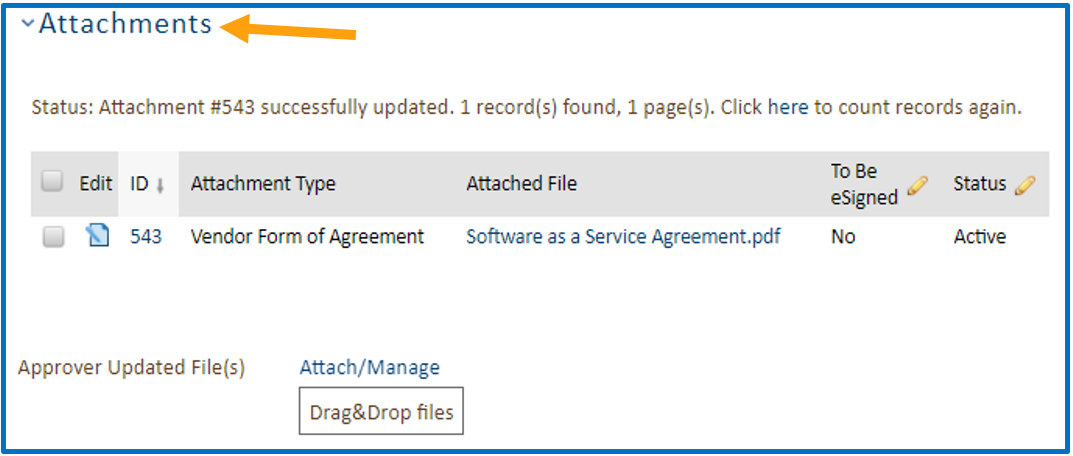
- You can attach additional files to the "Approver Updated File(s)" section. These will
be added to the contract record.
- If there are any concurrent approvals and/or next approvals you will see these in
their respective areas.

Navigating the Contract Management System
Watch Navigating the Contract Management System as a Power User
Watch Navigating a Contract Record
The Power User Interface of the Contract Management System, provides access to additional features within the system. The CMS system allows power users to create and manage contract that you have either created or have access to because of org security or your status as an approver.
The left hand pane of the screen is the main navigation area. It allows you to quickly navigate to the default Home page and My Assigned Contracts and Tables available to you.
 The Home tab, will take you to your default Home page that displays your primary Dashboard.
You may have multiple Dashboards to you. To navigate between dashboards, use the drop-down
menu at the top of the dashboard area to select a different dashboard from the drop-down
list.
The Home tab, will take you to your default Home page that displays your primary Dashboard.
You may have multiple Dashboards to you. To navigate between dashboards, use the drop-down
menu at the top of the dashboard area to select a different dashboard from the drop-down
list.
 Further down the left navigation bar you have My Assigned tab, which is used to provide
quick access to all contracts that have been assigned to you. You can choose either
to see All your Assigned Records from all statuses and tables or navigate to one of
the saved searches to navigate to particular status.
Further down the left navigation bar you have My Assigned tab, which is used to provide
quick access to all contracts that have been assigned to you. You can choose either
to see All your Assigned Records from all statuses and tables or navigate to one of
the saved searches to navigate to particular status.
 By clicking on one of the tables in the My Assigned or Tables sections of the left-hand
navigation bar, you can access the records within that table. At the top of records
pane on the right, it will display the number of records found within that table.
Click on the “Click for details..” to see the details to see the search criteria for
that table, if applicable.
By clicking on one of the tables in the My Assigned or Tables sections of the left-hand
navigation bar, you can access the records within that table. At the top of records
pane on the right, it will display the number of records found within that table.
Click on the “Click for details..” to see the details to see the search criteria for
that table, if applicable.
Within the Contracts table you can click "New" to create a new contract request. By click on the column header of the table you can change the sort order of the records being displayed.

To access the record you can click on the record ID or the edit Icon, if you need to edit the record.
Printing and Downloading Records
You can Print or Download records within the Table View by clicking on the Print Icon in the upper-right hand corner.
- First select the record(s) you would like to download or print by checking the box to the left of the record. You can select all records on the page or all found records by checking the box at the top of the checkbox column and making a selection.
- Next navigate to the print icon and select “Print/Download Table View”.
 A Preview of the records you selected will display and then select Print or Download.
- By Clicking “Print”, another preview window will open and display a print preview
and provides your print options. If Saving a PDF, click Save to download your preview,
or if available, you may select a printer to print to using the Destination drop-down.

- Selecting "Download" will allow you to export the record detail to either tab-delimited text or excel.
 When you click Finish, the system will prepare your export. When ready, you will see
“Click here" to download your export file.
When you click Finish, the system will prepare your export. When ready, you will see
“Click here" to download your export file.
 Downloading Contract Documents
It is also possible to download the documents associated with a record by clicking on “Save File(s) to Zip”. This will prepare a zip file that can be downloaded to your computer.
 to Zip") You will be prompted to which fields (files) you would like to download and to provide
a name for the file in the Filename field at the bottom of the form.
You will be prompted to which fields (files) you would like to download and to provide
a name for the file in the Filename field at the bottom of the form.
 When the file is ready, click the “Click here” to download and the file will be download.
 Personalizing Table Views
Power Users can select the field columns display are by going Views and either selecting a preset view or clicking on Edit and selecting the fields that you would like to display.

To manage searches displaying in the My Assigned area navigate to Search and select Manage
 A list of available searches will display. To add them to My Assigned, click the box
to the "Show in My Assigned" to the right of the search you would like added and click
Save and Close. To remove a search, uncheck the box.
A list of available searches will display. To add them to My Assigned, click the box
to the "Show in My Assigned" to the right of the search you would like added and click
Save and Close. To remove a search, uncheck the box.

Setting Work Status to “On Vacation” and adding a Backup Person
When planning to be out of the office, it possible to turn “On Vacation” for your Work Status, so requests do not get held up while you are out of the office. Follow these four easy steps to get this setup.
- Navigate to My Profile located in the upper-left corner of the window.

- Click on the "Job" tab.
- In the "Backup Person" field type the name of the individual (First Last) or use the search tool to locate the person you would like to have receive your Approvals.
- Next In the "Working Status" field use the dropdown to indicate "On Vacation" to have
the Backup Person initiated while you are away.

- Click "Save" to save your changes.

When you return, simple switch your "Working Status" back to "Working".
Last Updated